Hello all! After a considerable break, I am back… lots went on during this time – for one, moving countries (I am nowliving in sunny Portugal!). Server is back online and so is the blog! Hope to start publishing new content soon enough!
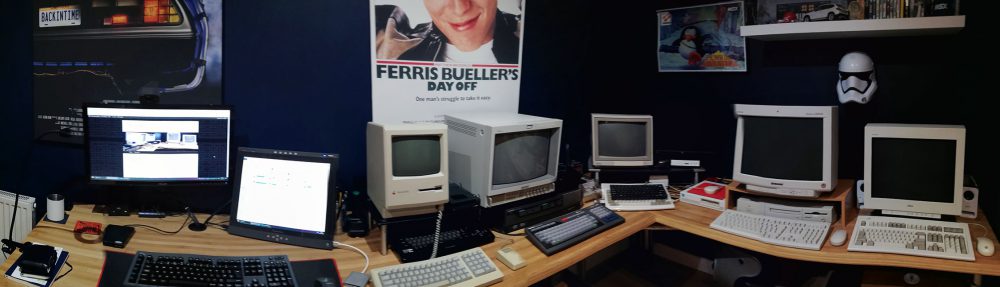
One of the problems I have on my benches is the lack of space… those old computers do take a lot of space and, having them set on a bench with all the keyboards is really messy. So, I thought that having an ADB KVM (Keyboard Video and Mouse) switch would allow me to share the same keyboard / mouse setupo with a couple (or more) Macs.
I started looking for a solution like that, without success… well, there is a solution provided by Dr Bott called Moniswitch, which basically was an ADB KVM solution. But it is a bit costly and, in my case, I really didn’t need the Video switch (mainly the ADBs, only). So, spending that much money to something I would not use in full didn’t seem right. So I started thinking on making one on my own… since this device would be mainly passive, I shoul dbe able to create one using a roteary dial of sorts… but then the gods smilled at me… I saw at eBay someone selling a Mac serial switch… yes, serial, not ADB. But I knew I could adapt it to my needs, as the ADB plug would fit a serial connector if you just get rid of a small tab in the plug.
So, £15 later, the serial switch arrived. And I modded to be used for ADB. The video showing this follows below.
Just for the fun of it, I tried out connecting a modded Atari (with added composite and audio out ports) to my Powermac 5500 video-in card. And, the result you can see below 🙂
Yes, I know… yet another G5 case mod… but, what can I do if the G5 case is SO amazing??? I bought a full G5 Powermac about an year ago at eBay for about 20 quid. The G5 wasn’t working and I didn’t intend to get it back to work, anyways. Just wanted the case. And the case was in perfect shape, no scratches or dents – very unusual, by the way… so, it would be a perfect fit to my project. I drove 2 hours round trip to get the case, and I left it in my garage for all this time. I knew this project would take me a great amount of time and patience, and I only wanted to start it when I was fully committed.
Well, with the lock-down, the time has come. I started by disassembling the whole thing – that, I should add – might be the most challenging bit of the project. Different than other Powermacs, the G5 was built in a very “locked” way, making it very challenging to fully disassembling it. But with time and a lot of Internet instructional videos, it’s doable of course. You have to make sure you don’t damage the chassis while disassembling the whole thing. So, again, take your time and don’t force anything out (like some people normally do).
Of course PC ATX (and variants) motherboards will not fit the case directly. Some modifications are needed to fit them properly. In my case, I choose a mATX board. I needed to cut the original mesh back plate of the G5 and also get the motherboard tray refitted. To obtain a greater finish, I choose the obvious option: Laser Hive G5 mATX original kit. It costed me £60, but it is totally worth it. You can see below the finished cut (I used a generic dremel with metal cutting discs and was able to finish the job in around 15 min).
And, here, the finished back panel, with the motherboard and video card already fitted. I still haven’t finished the project, as I need to buy the CPU, memory and Disk (I will go for a 1 TB M.2 SSD, which saves up the mess with cables and it is way faster than regular SSDs). I also still need to mod the from power button and USB, but I don’t think this will be too hard to do. Once all is done, I will post some pictures of the finished G5 atx here.