I love the Powerbook 5300 because it brings me so many good memories. It has been a while since I was looking for one. About 6 months ago, I found one at eBay going for about 25 quid, so I bought it. It turned out to have a fried motherboard. So, I kept it for spares. I kept looking from time to time trying to find another one… finally, I did. Last week, I bought the one you will see in the below video for 40 quid.
It was in operational state, but the seller warned me about a bad battery leakage. So, I knew it would have to undergo some cleaning and repairing work. I was just hoping the motherboard was fine. And it was!
The work was a success, and I documented it in the video that follows. Hope you enjoy it!
I am in the process of redecorating my office, and I wanted to have some cool-looking 80’s motif poster hanging on some of my walls. O searched eBay, Amazon and some other sites for it, but couldn’t find anything I really liked – or in the size (an price range) I wanted.
So, I thought about doing it myself. I imagined it shouldn’t be that hard. The Internet is full of pictures and all I needed to do was finding one that was aligned with my taste, use Photoshop to make it right in terms of size and resolution and send it to the print shop.
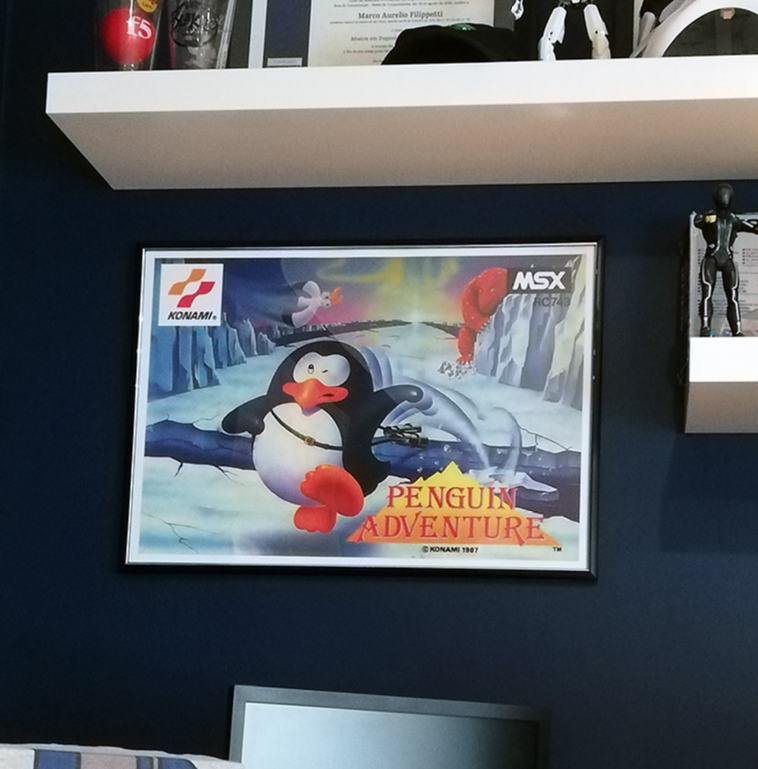
To test it, I went with a classic 80’s MSX game, called “Penguin Adventure”. I love that game and it really brings me a lot of good memories. So, I googled for it to see what pictures I could find on it. Bingo, found the one below, which is a photograph of the game box.
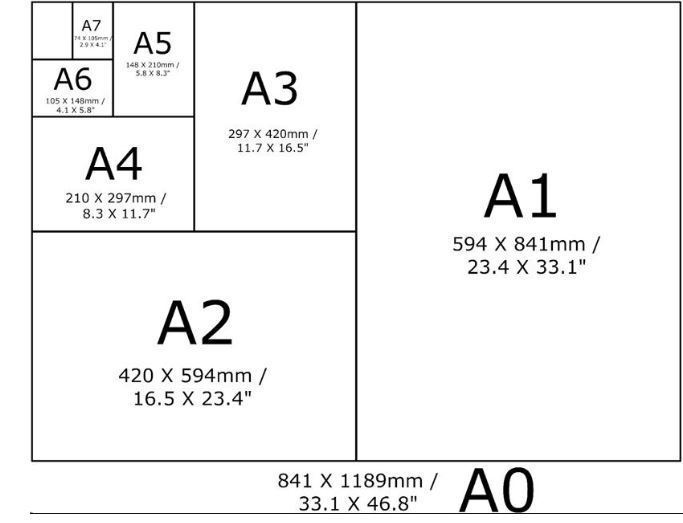
As it can be seen, the resolution wasn’t that great, and the size wasn’t exactly right either. I wanted an A2 size poster, so that would require some changes on the selected picture. A2 size is depicted below.
So, I edited the picture on Photoshop to the A2 measure (in mm) and a resolution of 150 dpi (normally, enough for picture printing). Of course when you increase the picture size, quality is going to get decreased – and that’s why it is so important to get the original picture in the highest resolution you can. I also took the opportunity to crop out the parts in the picture I didn’t want. I also added a 30 mm bleeding frame to it, so it would have some white spacing between the hard frame and the picture, after framed. The end result (here, in lower res) was like below:
Now, to print it, I opted for a print shop with online service. That is so much more convenient. I chose https://www.instantprint.co.uk/, created an account, picked the print size (A2) uploaded the jpeg and they generated the digital proof, all in real time. You then need to approove the proof and pay for it (it cost me 8 pounds). Two days later, it arrived. Meanwhile, I bought the frame at Amazon, for about 12 pounds, which arrived 24hs later.
The final result can be seen in the below picture.Total cost: 20 pounds (I guess it could be cheaper if you can get it printed for less and make your own frame…!).
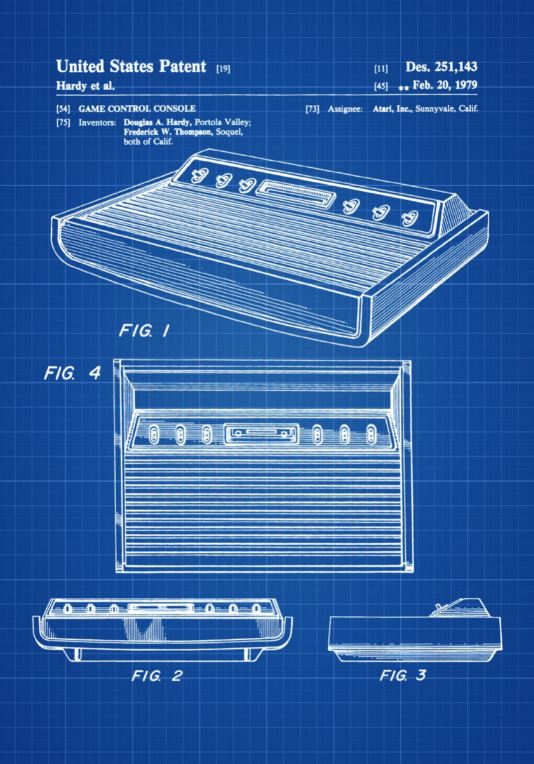
The result was so great that I am working on an A1 size poster, now. This one would use the Atari patent picture I found on the Net (below). Hopefully, it will turn out as nice as the Penguin one! I will tell you all about it later, when it is ready.
This video shows a full disassembly of a Powerbook 3400c, thorough cleaning and test. This Powerbook was bought at eBay for 40 quid, in an operational state. But the PRAM (CMOS) battery needed to be removed to avoid leakage, so I took the opportunity to fully disassemble it and clean it.
In this post I elaborate a bit more on the issue itself, and also give you some tips on how to figure out where is the defective potentiometer (pot) that is causing the issue. It could be a linear (slider) pot or a rotary (knob) pot. In my case, it was a knob pot (the AMP knob).
The ghost editing issue is a well known and common issue on the Roland JP8000 synths. Apparently, Roland tried to save up on components and didn’t use high quality pots in this particular synth, which results in some of them failing after almost 20 years.
The linear pots (the sliders) are easier to clean and lubricate, as they have a slot where the service can be done. Ideally, if the condition of the pot is way to bad, you should desolder it, disassemble and clean each component individually. But most of the time, a good cleaning with compressed air, isopropyl alcohol (99.9%) and a good fader lube (like Deoxit) does the job.
The rotary pots (knobs) are a bit trickier. Problem is that there is no good access to them. They are tightly closed and no cleaning can be done on them. I tried spraying some Deoxit on them, and it does get it. You can tell by the way they rotate after Deoxit has been sprayed. But in my case, the defective knob did not improve its condition after the “cleaning”. The video below shows my test after the cleaning. The issue remained.
Tip: To figure out which pot is generating random values at will, press and hold the SHIFT button. If any value is changed on ANY pot, you will see that in the LCD display. This is also an easy way to test some pots and see if the values they generate upon activity seem correct. The video shows this technique.
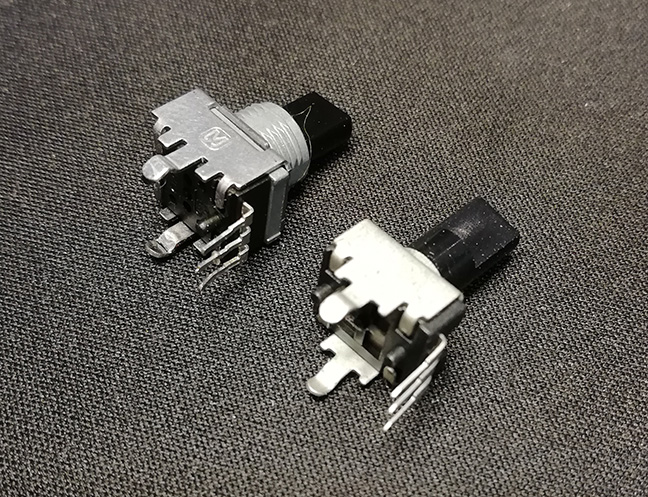
So, I had to desolder the pot and replace it. Luckily, finding replacement rotary knobs for the JP8000 is not that hard – and they are relatively cheap too. So, I went to eBay and bought 12 of those, 6 without center indent and 6 with it. Spent a total of 20 quid on them. Not too bad. They are not exactly the same, but they fit perfectly. The picture below shows on the left the original (defective) pot, and on the right, the replacement one. Case anyone is interested, they were bought from the user “synth-shack” at eBay.
So, pot replaced and new test done. Result: 100% OK this time 🙂 I also took the opportunity I was going to fully disassemble everything once again to replace the LCD display with a OLED one. Found a guy selling this at eBay for 50 quid and took a chance. The result can be seen in the below video.
So, there you have it…! A very nice vintage synth, with a lot of history to it, fully repaired and cleaned, and added to my collection. I am very pleased with the results!